Skript

PartsManagementExtension

Ihr wollte eine eigene Registerkarte in der EPLAN Artikeldatenbank? Kein Problem, zumindest per API.
Die Funktionen hier sind von EPLAN nicht offiziell Freigegeben und werden nicht supported. Dennoch gibt es eine kleine Beschreibung in der API-Hilfe.

Die Implementierung ist nicht ganz so einfach, da hier mit manuellen Events gearbeitet wird und diese muss man dann erst in der Action senden und im UserControl registrieren.

Addin:

using System.IO;
using System.Reflection;
using Eplan.EplApi.ApplicationFramework;
using Eplan.EplApi.MasterData;
using Eplan.EplSDK.WPF;
using Eplan.EplSDK.WPF.DB;

namespace Suplanus.Example.EplAddIn.PartsManagementExtensionExample
{
    class Addin : IEplAddIn
    {
        public string TabsheetName => nameof(PartsManagementExtensionContent);
        public string ItemType => "eplan.part";

        public string AddinName
        {
            get
            {
                string addinName = typeof(Addin).Assembly.CodeBase;
                addinName = Path.GetFileNameWithoutExtension(addinName);
                return addinName;
            }
        }        

        public bool OnRegister(ref bool isLoadingOnStart)
        {
            isLoadingOnStart = true;
            return true;
        }

        public bool OnUnregister()
        {
            var partsManagement = new MDPartsManagement();
            partsManagement.UnregisterAddin(AddinName);
            partsManagement.UnregisterItem(ItemType);
            partsManagement.UnregisterTabsheet(TabsheetName);

            return true;
        }

        public bool OnInit()
        {
            return true;
        }

        public bool OnInitGui()
        {
            var partsManagement = new MDPartsManagement();
            string actionName = nameof(PartsManagementExtensionExampleAction);

            partsManagement.RegisterAddin(AddinName, actionName);            
            partsManagement.RegisterItem(AddinName, ItemType);
            partsManagement.RegisterTabsheet(AddinName, ItemType, TabsheetName);
            DialogFactoryDB dialogBarFactory = new DialogFactoryDB(TabsheetName,
                typeof(PartsManagementExtensionContent));
            PartsManagementExtensionExampleAction.TabsheetName = TabsheetName;

            return true;
        }

        public bool OnExit()
        {
            return true;
        }
    }
}


Action:

using Eplan.EplApi.ApplicationFramework;
using Eplan.EplSDK.WPF.EEvent;

namespace Suplanus.Example.EplAddIn.PartsManagementExtensionExample
{
    class PartsManagementExtensionExampleAction : IEplAction
    {
        public static string TabsheetName = null;

        public void GetActionProperties(ref ActionProperties actionProperties) { }

        public bool OnRegister(ref string name, ref int ordinal)
        {
            name = nameof(PartsManagementExtensionExampleAction);
            return true;
        }

        public bool Execute(ActionCallingContext actionCallingContext)
        {
            // Sent events to WPF control from base action
            string itemType = string.Empty;
            string action = string.Empty;
            string key = string.Empty;
            actionCallingContext.GetParameter("itemtype", ref itemType);
            actionCallingContext.GetParameter("action", ref action);
            actionCallingContext.GetParameter("key", ref key);

            WPFDialogEventManager wpfDialogEventManager = new WPFDialogEventManager();

            switch (action)
            {
                case "SelectItem":
                case "SaveItem":
                case "PreShowTab":
                case "OpenDatabase":
                case "CreateDatabase":
                    wpfDialogEventManager.send("XPartsManagementDialog", action, key);
                    break;
            }

            return true;
        }
    }
}


XAML: CodeBehind

using Eplan.EplApi.MasterData;
using Eplan.EplSDK.WPF.EEvent;
using Eplan.EplSDK.WPF.Interfaces.DialogServices;

namespace Suplanus.Example.EplAddIn.PartsManagementExtensionExample
{
    public partial class PartsManagementExtensionContent : IDialog
    {
        public string Caption => nameof(PartsManagementExtensionContent);
        public bool IsTabsheet => true;
        public ViewModel ViewModel { get; set; } 

        private readonly MDPartsManagement _partsManagement = new MDPartsManagement();

        public PartsManagementExtensionContent()
        {
            InitializeComponent();

            ViewModel = new ViewModel();
            DataContext = ViewModel;

            ViewModel.IsReadOnly = _partsManagement.SelectedPartsDatabase.IsReadOnly;

            // Events, called from Action of this Tab
            WPFDialogEventManager dialogEventManager = new WPFDialogEventManager();
            dialogEventManager.getOnWPFNotifyEvent("XPartsManagementDialog", "SelectItem").Notify += SelectItem;
            dialogEventManager.getOnWPFNotifyEvent("XPartsManagementDialog", "SaveItem").Notify += SaveItem;
            dialogEventManager.getOnWPFNotifyEvent("XPartsManagementDialog", "PreShowTab").Notify += PreShowTab;
            dialogEventManager.getOnWPFNotifyEvent("XPartsManagementDialog", "OpenDatabase").Notify += OpenDatabase;
            dialogEventManager.getOnWPFNotifyEvent("XPartsManagementDialog", "CreateDatabase").Notify += CreateDatabase;
        }

        private void CreateDatabase(string data)
        {
            
        }

        private void OpenDatabase(string data)
        {
            
        }

        private void PreShowTab(string data)
        {
            
        }

        private void SelectItem(string data)
        {
            
        }

        private void SaveItem(string data)
        {
            
        }

    }
}


XAML: UserControl

<UserControl
    x:Class="Suplanus.Example.EplAddIn.PartsManagementExtensionExample.PartsManagementExtensionContent"
    xmlns="http://schemas.microsoft.com/winfx/2006/xaml/presentation"
    xmlns:x="http://schemas.microsoft.com/winfx/2006/xaml"
    xmlns:d="http://schemas.microsoft.com/expression/blend/2008"
    xmlns:mc="http://schemas.openxmlformats.org/markup-compatibility/2006"
    d:DesignHeight="300"
    d:DesignWidth="300"
    DataContext="{Binding RelativeSource={RelativeSource Self}, Path=ViewModel}"
    mc:Ignorable="d">
    <Grid Margin="10">
        <Viewbox>
            <TextBox
                IsEnabled="{Binding IsEnabled}"
                Text="Hello PartsManagementExtension!"
                TextWrapping="Wrap" />
        </Viewbox>
    </Grid>
</UserControl>


ViewModel:

using System;
using System.ComponentModel;
using System.Runtime.CompilerServices;

namespace Suplanus.Example.EplAddIn.PartsManagementExtensionExample
{
    public class ViewModel : INotifyPropertyChanged
    {
        private bool _isReadonly;
        public bool IsReadOnly
        {
            get { return _isReadonly; }
            set
            {
                if (value == _isReadonly) return;
                _isReadonly = value;
                OnPropertyChanged();
            }
        }

        public event PropertyChangedEventHandler PropertyChanged;
        protected virtual void OnPropertyChanged([CallerMemberName] String propertyName = "")
        {
            PropertyChanged?.Invoke(this, new PropertyChangedEventArgs(propertyName));
        }
    }
}


Natürlich findet Ihr das wie gewohnt auf GitHub!
Von |2019-03-14T08:42:17+01:002017-10-18|EPLAN, EPLAN-API|

Navigator in API

Ewig steht das schon auf meiner Todo-Liste: Einen eigenen Navi per API implementieren.
Die Möglichkeit welche ich hier beschreibe ist nicht teil der offiziellen EPLAN API. Somit bekommt man auch kein Support oder Ähnliches.

Dennoch finde ich die Möglichkeit super und denke viele von Euch haben dafür auch einen Anwendungsfall.

Eigentlich braucht man nur eine DialogBarFactory und ein WPF-UserControl dazu:

using System.Reflection;
using Eplan.EplApi.ApplicationFramework;
using Eplan.EplSDK.WPF;

namespace Suplanus.EplAddIn.NavigatorExample
{
    class NavigatorExample : IEplAddIn
    {
        public bool OnRegister(ref bool isLoadingOnStart)
        {
            isLoadingOnStart = true;
            return true;
        }

        public bool OnUnregister()
        {
            return true;
        }

        public bool OnInit()
        {
            return true;
        }

        public bool OnInitGui()
        {
            // Get name from class
            // ReSharper disable once PossibleNullReferenceException
            var className = MethodBase.GetCurrentMethod().DeclaringType.Name;
            DialogBarFactory dialogBarFactory = new DialogBarFactory(className, typeof(NavigatorContent), DialogDockingOptions.Any, 0);

            return true;
        }

        public bool OnExit()
        {
            return true;
        }
    }
}

Im UserControl müssen aber viele Interfaces implementiert sein :^)

using System.Reflection;
using Eplan.EplSDK.WPF.Interfaces;
using Eplan.EplSDK.WPF.Interfaces.DialogServices;

namespace Suplanus.EplAddIn.NavigatorExample
{
    public partial class NavigatorContent : IDialog, IDialogBar, IDialogComponentAccess, ICallingContext, IDialogState, IDialogAction, IDialogClose, IElementStateAccess
    {
        public string Caption { get; set; }
        public bool IsTabsheet { get; set; }
        public int UniqueBarID { get; set; }
        public IDialogComponent Component { get; set; }
        public object Context { get; set; }
        public IDialogStateManager DialogStateManager { get; set; }
        public IElementStateCollection ElementStateCollection { get; set; }

        public NavigatorContent()
        {
            // Iniit
            ElementStateCollection = new Eplan.EplSDK.WPF.Controls.Persistency.ElementStateCollection();
            ElementStateCollection.Load(nameof(NavigatorContent));

            InitializeComponent();

            Caption = "NavigatorExample";
            IsTabsheet = false;

            // Use Class name for uniqueid
            // ReSharper disable once PossibleNullReferenceException
            var className = MethodBase.GetCurrentMethod().DeclaringType.Name;
            UniqueBarID = (int)(uint)className.GetHashCode();           
            
        }
       
        public void init()
        {
            
        }

        public bool isValid()
        {
            return true;
        }

        public void reload()
        {
            
        }

        public void save()
        {
            
        }

        public void close()
        {
            
        }

    }
}

Anbei ein Beispiel UserControl in WPF:

<UserControl
    x:Class="Suplanus.EplAddIn.NavigatorExample.NavigatorContent"
    xmlns="http://schemas.microsoft.com/winfx/2006/xaml/presentation"
    xmlns:x="http://schemas.microsoft.com/winfx/2006/xaml"
    xmlns:d="http://schemas.microsoft.com/expression/blend/2008"
    xmlns:mc="http://schemas.openxmlformats.org/markup-compatibility/2006"
    d:DesignHeight="300"
    d:DesignWidth="300"
    mc:Ignorable="d">
    <Grid Margin="10">
        <Viewbox>
            <TextBlock Text="Hello Navigator!" TextWrapping="Wrap" />
        </Viewbox>
    </Grid>
</UserControl>

Eine lauffähiges Beispiel findet Ihr auf GitHub

Von |2022-04-13T11:20:49+02:002017-09-28|EPLAN, EPLAN-API|

XMExportMacrosFromMacroProjectAction

Man hat ein Makroprojekt mit Seitenmakros, welche Fenstermakros enthalten. Die Fenstermakros liegen aber in einem anderen Makroprojekt und sollen nur von dort generiert werden.

Ab der Version 2.7 gibt es eine interne Action (Verwendung auf eigene Gefahr, kein Support von EPLAN), welche steuern kann, was für Makros exportiert werden sollen:

XMExportMacrosFromMacroProjectAction 

  • WindowMacroDirectory : destination directory for window macros (optional)
  • PageMacroDirectory : destination directory for page macros (optional)
  • WholeProject : whether export all pages (optional, default=NO)
  • NoDialog : whether to show dialog (optional, default=YES|NO, if WholeProject is YES)
  • FilterScheme : Name of filter scheme (as in macro navigator), applied only if WholeProject is YES (optional)
  • OverwriteExistingMacros : whether to overwrite existing Macros (optional, default=YES)
Von |2017-11-09T11:16:26+01:002017-09-15|EPLAN, EPLAN-Scripts|

Navigatoren einblenden / ausblenden

Dank dem API-Support der wie immer einfach nur toll ist, gibt es nun eine Möglichkeit Navigatoren ein- bzw. auszublenden.
Vielen Dank auch an FrankS der mir den Tip mit den Actions gegeben hat!

Ich hab das mal ausprogrammiert. Mit der Action kann man mehrere Navigatoren (oder einen) umschalten.

Update 2022-11-17
Ab EPLAN Version 2022 heißt der Einstellungsknoten anders:

string schemePath = "USER.WORKSPACE.NAMED";

wird zu:

string schemePath = "USER.WORKSPACE_BCG.NAMED";

Hab das im Script unten schon angepasst.

using System.Windows.Forms;
using Eplan.EplApi.ApplicationFramework;
using Eplan.EplApi.Base;
using Eplan.EplApi.Scripting;

namespace EplanScriptingProjectBySuplanus.ShowNavigators
{
    class ShowNavigators
    {
        [DeclareAction("ShowNavigators")]
        public bool Action(string actionNavigatorVisible)
        {
            // Objects
            var commandLineInterpreter = new CommandLineInterpreter();
            SchemeSetting schemeSetting = new SchemeSetting();
            Settings settings = new Settings();
            string schemePath = "USER.WORKSPACE.NAMED";
            string schemeName = "dummy";

            // SaveWorkspace
            commandLineInterpreter.Execute("SaveWorkspaceAction /Workspacename:dummy");

            // Parse parameter
            var splitGroups = actionNavigatorVisible.Split('|');
            foreach (var splitGroup in splitGroups)
            {
                // Get values
                var splitNavigators = splitGroup.Split(';');
                if (splitNavigators.Length != 2)
                {
                    MessageBox.Show("Invalid parameter", "ShowNavigators - Warning", MessageBoxButtons.OK, MessageBoxIcon.Warning);
                    return false;
                }

                string navigatorName = splitNavigators[0];
                string visibleText = splitNavigators[1].ToUpper();
                bool visible = visibleText == "TRUE" || visibleText == "1";

                // Settings path e.g.: USER.WORKSPACE_BCG.NAMED.dummy.Data.Visibility.XMacroPdd
                string settingsPath = schemePath + "." + schemeName + ".Data.Visibility." + navigatorName;

                // Hide & Seek :^)
                if (visible)
                {
                    // Show
                    if (!settings.ExistSetting(settingsPath))
                    {
                        commandLineInterpreter.Execute("GfDialogManagerShow /DialogName:" + navigatorName);
                    }
                }
                else
                {
                    // Hide
                    if (settings.ExistSetting(settingsPath))
                    {
                        commandLineInterpreter.Execute("GfDialogManagerHide /DialogName:" + navigatorName);
                    }
                }
            }

            // RemoveWorkspace            
            schemeSetting.Init(schemePath);
            if (schemeSetting.CheckIfSchemeExists(schemeName))
            {
                schemeSetting.RemoveScheme(schemeName);
            }
            

            return false;
        }
    }
}


Aufruf erfolgt mit (in diesem Beispiel wird der Seitennavigator sichtbar und der Betriebsmittelnavigator unsichtbar geschaltet):

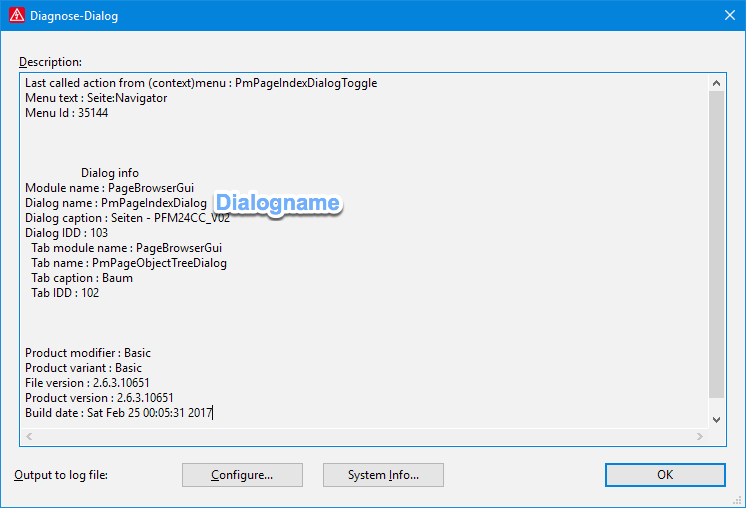
ShowNavigators /actionNavigatorVisible:"PmPageIndexDialog;true|XNavigatorDlg;false"

Mehrere Navigatoren werden mit dem Pipe-Zeichen “|” getrennt. Pro Navigator muss Semikolon “;” getrennt folgendes angegeben werden:

  • Dialogname
  • Sichtbar (True: wird sichtbar geschaltet, False: wird unsichtbar geschaltet)


Die Daten bekommt Ihr wenn der Dialog eingeblendet wurde und Ihr STRG+^ drückt.


Download auf GitHub

Von |2022-11-17T10:07:10+01:002017-08-14|EPLAN, EPLAN-Scripts|

Toolbar per Script erzeugen

War mir bis jetzt auch nicht bekannt, aber dank des Beitrages von Franks jetzt schon :^)

// Create Toolbar
string toolbarName = "TEST_Toolbar";
Eplan.EplApi.Gui.Toolbar toolbar = new Eplan.EplApi.Gui.Toolbar();            
toolbar.CreateCustomToolbar(toolbarName, Eplan.EplApi.Gui.Toolbar.ToolBarDockPos.eToolbarFloat, 0, 0, true);

// Add buttons
toolbar.AddButton(toolbarName, 0, "strAction0", @"$(MD_IMG)\Toolbar\MountingPlateHandling\MP_0.jpg", "Tooltip0");
toolbar.AddButton(toolbarName, 1, 0); // Separator
toolbar.AddButton(toolbarName, 2, "strAction2", @"$(MD_IMG)\Toolbar\MountingPlateHandling\MP_90.jpg", "Tooltip2");
// Remove toolbar
toolbar.RemoveCustomToolbar(toolbarName);
Von |2017-11-09T11:16:27+01:002017-08-11|EPLAN, EPLAN-Scripts|
Nach oben