Navigatoren einblenden / ausblenden
Dank dem API-Support der wie immer einfach nur toll ist, gibt es nun eine Möglichkeit Navigatoren ein- bzw. auszublenden.
Vielen Dank auch an FrankS der mir den Tip mit den Actions gegeben hat!
Ich hab das mal ausprogrammiert. Mit der Action kann man mehrere Navigatoren (oder einen) umschalten.
Update 2022-11-17
Ab EPLAN Version 2022 heißt der Einstellungsknoten anders:
string schemePath = "USER.WORKSPACE.NAMED";
wird zu:
string schemePath = "USER.WORKSPACE_BCG.NAMED";
Hab das im Script unten schon angepasst.
using System.Windows.Forms;
using Eplan.EplApi.ApplicationFramework;
using Eplan.EplApi.Base;
using Eplan.EplApi.Scripting;

namespace EplanScriptingProjectBySuplanus.ShowNavigators
{
    class ShowNavigators
    {
        [DeclareAction("ShowNavigators")]
        public bool Action(string actionNavigatorVisible)
        {
            // Objects
            var commandLineInterpreter = new CommandLineInterpreter();
            SchemeSetting schemeSetting = new SchemeSetting();
            Settings settings = new Settings();
            string schemePath = "USER.WORKSPACE.NAMED";
            string schemeName = "dummy";

            // SaveWorkspace
            commandLineInterpreter.Execute("SaveWorkspaceAction /Workspacename:dummy");

            // Parse parameter
            var splitGroups = actionNavigatorVisible.Split('|');
            foreach (var splitGroup in splitGroups)
            {
                // Get values
                var splitNavigators = splitGroup.Split(';');
                if (splitNavigators.Length != 2)
                {
                    MessageBox.Show("Invalid parameter", "ShowNavigators - Warning", MessageBoxButtons.OK, MessageBoxIcon.Warning);
                    return false;
                }

                string navigatorName = splitNavigators[0];
                string visibleText = splitNavigators[1].ToUpper();
                bool visible = visibleText == "TRUE" || visibleText == "1";

                // Settings path e.g.: USER.WORKSPACE_BCG.NAMED.dummy.Data.Visibility.XMacroPdd
                string settingsPath = schemePath + "." + schemeName + ".Data.Visibility." + navigatorName;

                // Hide & Seek :^)
                if (visible)
                {
                    // Show
                    if (!settings.ExistSetting(settingsPath))
                    {
                        commandLineInterpreter.Execute("GfDialogManagerShow /DialogName:" + navigatorName);
                    }
                }
                else
                {
                    // Hide
                    if (settings.ExistSetting(settingsPath))
                    {
                        commandLineInterpreter.Execute("GfDialogManagerHide /DialogName:" + navigatorName);
                    }
                }
            }

            // RemoveWorkspace
            schemeSetting.Init(schemePath);
            if (schemeSetting.CheckIfSchemeExists(schemeName))
            {
                schemeSetting.RemoveScheme(schemeName);
            }


            return false;
        }
    }
}
Aufruf erfolgt mit (in diesem Beispiel wird der Seitennavigator sichtbar und der Betriebsmittelnavigator unsichtbar geschaltet):
ShowNavigators /actionNavigatorVisible:"PmPageIndexDialog;true|XNavigatorDlg;false"
Mehrere Navigatoren werden mit dem Pipe-Zeichen “|” getrennt. Pro Navigator muss Semikolon “;” getrennt folgendes angegeben werden:
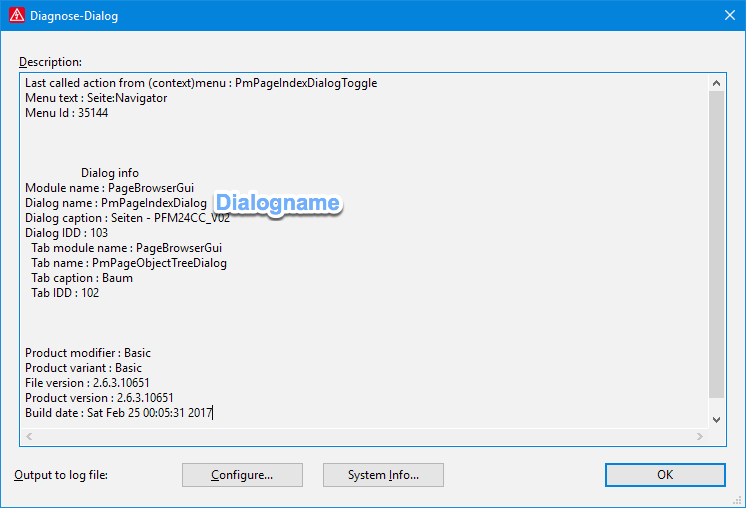
- Dialogname
- Sichtbar (True: wird sichtbar geschaltet, False: wird unsichtbar geschaltet)
Die Daten bekommt Ihr wenn der Dialog eingeblendet wurde und Ihr STRG+^ drückt.
