Coding

VSColorOutput

Mich hat der monotone Output in Visual Studio immer schon gestört. Viele Informationen die (meist) nicht interessieren und einige sehr wichtige die man vor lauter Bäumen nicht sieht.

Durch Zufall, ohne danach zu suchen, bin ich auf VSColorOutput gestoßen und bin begeistert. Echte Empfehlung!

screenshot

Von |2018-04-24T16:13:04+02:002016-10-14|C#, Coding|

HueRainbowClock

Man hat ja schon gemerkt dass ich gerade mein Büro automatisiere…

Nun hatte ich bereits schon eine Hue Lampe, welche ich über IFTTT gesteuert habe. Diese hat jede Stunde die Farbe gewechselt.
Problem: Auch dann wenn ich nicht im Büro bin.

Somit hab ich mir eine RainbowClock für die Hue in Python geschrieben :^)

Läuft bei mir an wenn der Rechner startet und somit geht mir dann automatisch ein Licht auf.
Und ist es nicht cool zu sagen: “Oh es ist schon Rot, ich sollte mal Pause machen.”

HueRainbowClock on GitHub

Das Script läuft zwar auf meinem Mac, aber die Lampe hängt hinter meinem “Test-Monitor” an dem grad ein Raspberry Pi hängt :^)
Es würde auch auf dem Pi laufen…

#############################################################################
# HueRainbowClock
#############################################################################

import os
import datetime
import time

from phue import Bridge

import colorama
from colorama import Fore, Back, Style

from rgb_cie import Converter

HUEBRIDGEIP = "192.168.178.79"
LIGHTNAME = "Buro"

LAMP = ""

# Executes hour changed
def DingDong():
	global hourBefore

	# Turn lamp on
	LAMP.brightness = 254

	# Change color
	converter = Converter()

	if hour == 1 or hour == 13:
		xy = converter.rgbToCIE1931(255,0,0)

	if hour == 2 or hour == 14:
		xy = converter.rgbToCIE1931(255,128,0)

	if hour == 3 or hour == 15:
		xy = converter.rgbToCIE1931(255,255,0)

	if hour == 4 or hour == 16:
		xy = converter.rgbToCIE1931(128,255,0)

	if hour == 5 or hour == 17:
		xy = converter.rgbToCIE1931(0,255,0)

	if hour == 6 or hour == 18:
		xy = converter.rgbToCIE1931(0,255,128)

	if hour == 7 or hour == 19:
		xy = converter.rgbToCIE1931(0,255,255)

	if hour == 8 or hour == 20:
		xy = converter.rgbToCIE1931(0,128,255)

	if hour == 9 or hour == 21:
		xy = converter.rgbToCIE1931(0,0,255)

	if hour == 10 or hour == 22:
		xy = converter.rgbToCIE1931(128,0,255)

	if hour == 11 or hour == 23:
		xy = converter.rgbToCIE1931(255,0,255)

	if hour == 12 or hour == 24:
		xy = converter.rgbToCIE1931(255,0,128)

	LAMP.xy = xy

	# Log
	text = "==> " + str(hour) + " ==> " + str(xy)
	print(Fore.LIGHTBLUE_EX + text + Style.RESET_ALL)

	# Save for check later
	hourBefore = hour

# Init hue
print(Fore.LIGHTBLUE_EX + 'Init hue' + Style.RESET_ALL)
Bridge = Bridge(HUEBRIDGEIP)
Bridge.connect() # If the app is not registered and the button is not pressed, press the button and call connect() (this only needs to be run a single time)
Bridge.get_api() # Get the bridge state (This returns the full dictionary that you can explore)

# Get a dictionary with the light name as the key
light_names = Bridge.get_light_objects('name')

# Get light object
LAMP = light_names[LIGHTNAME]

# Do it to the end of time
print(Fore.LIGHTBLUE_EX + 'Read time' + Style.RESET_ALL)
hourBefore = ""

while(True):
	# Check time
	now = datetime.datetime.now()
	hour = int(now.strftime("%H"))

	# Test
	#for i in range(1,12):
	#	hour = i
	#	DingDong()
	#	time.sleep(2)

	# Check if already set
	if hour == hourBefore:
		continue # do nothing

	# Doit
	DingDong()


Von |2016-10-12T12:54:29+02:002016-10-12|HueRainbowClock, Projekte, Python|

FritzboxOnAir

Wenn man ein Büro für sich alleine hat, kennt man bestimmt die Situation: Man telefoniert gerade und eine andere Person klopft bzw. kommt zur Tür herein.

Aus diesem Grund wollte ich eine “OnAir” Lampe, welche man ja oftmals in Studios sieht. Diese soll anzeigen, dass ich gerade telefoniere.

Habe mir überlegt dass mit einem Raspberry Pi / Arduino zu machen… bin aber dann bei der Recherche darauf gekommen, dass die Hue-Lampen (ohne Farbe) garnicht so teuer sind. Diese kann man auch über eine API steuern.
Danach ist mir eingefallen: Wäre es nicht praktisch wenn bei einem eingehenden & ausgehenden Telefonat gleich die Lautstärke des Macs auf 0 gesetzt wird? Somit braucht man das auch nicht mehr machen…

Auf dem Video sieht hört man schlecht, dass die Musik aus geht, das ist aber der Fall und sooo praktisch :^)

Überlegte mir das in Mono mal zu schreiben, aber das ist immer noch ein graus, wenn man fertige Libraries einsetzen möchte, da diese nicht unter Mono laufen. Dann müsste ich den CallMonitor der Fritzbox neu schreiben, wie auch die C# Hue API. Das macht aber keinen Spaß.

Auf der Suche nach fertigen APIs bin ich bei Python hängengeblieben. Bin da zwar nicht so fit, aber kann doch nicht schaden. Und es war einfacher als gedacht, mit ein paar Zeilen Code und diesen Libraries, war das Projekt getan:

FritzboxOnAir on GitHub

#############################################################################
# FritzboxOnAir
#############################################################################

import os
from call_monitor import callmonitor
from phue import Bridge

import colorama
from colorama import Fore, Back, Style

HUEBRIDGEIP = "192.168.178.79"
LIGHTNAME = "OnAir"
PHONENUMBER = "9767518"
Volume = "" # todo: volumne only saved once (on startup)

# Reads the system volume to set it after call back to the value
def readVolume():
    v = os.popen('volume-osx')
    return v.read()

# Executes if calling
def Calling():
    print(Back.GREEN + 'Calling' + Style.RESET_ALL)
    Volume = readVolume() # for later
    os.system("volume-osx 0") # mute system volume
    Bridge.set_light(LIGHTNAME,'on', True) # turn light on

# Executes if no calling
def Sleeping():
    print(Back.CYAN + 'Sleeping' + Style.RESET_ALL)
    os.system("volume-osx " + Volume) # set to old value
    Bridge.set_light(LIGHTNAME,'on', False) # turn light off

# Get event from fritzbox
def callBack (self, id, action, details):
    print("Call: " + str(id) + " - " + action)
    print(details)

    # Check if the phonenumber is is in details
    if ("'to': '" + PHONENUMBER + "'" in str(details) or "'from': '" + PHONENUMBER + "'" in str(details)):
        # Parse Calling
        if (action == "outgoing" or action == "CALL" or action == "CONNECT" or action == "accepted" or action == "incoming" or action == "RING"):
            Calling()
        # Parse Sleeping: Checks also if calling is active
        if (action == "closed" or action == "DISCONNECT") and ("CONNECT" in str(details)):
            Sleeping()

# Read volume for later
print(Fore.LIGHTBLUE_EX + 'Get volume' + Style.RESET_ALL)
Volume = readVolume()

# Init hue
print(Fore.LIGHTBLUE_EX + 'Init hue' + Style.RESET_ALL)
Bridge = Bridge(HUEBRIDGEIP)
Bridge.connect() # If the app is not registered and the button is not pressed, press the button and call connect() (this only needs to be run a single time)
Bridge.get_api() # Get the bridge state (This returns the full dictionary that you can explore)

# Init call monitor
print(Fore.LIGHTBLUE_EX + 'Init Call monitor' + Style.RESET_ALL)
call = callmonitor() # Create new instance of py-fritz-monitor, Optinal parameters: host, port
call.register_callback (callBack) # Defines a function which is called if any change is detected, unset with call.register_callback (-1)
call.connect() # Connect to fritzbox

print(Fore.LIGHTBLUE_EX + 'Write close to end the script' + Style.RESET_ALL)
while(True):
    inputText = input()
    if inputText == "close":
        print(Fore.LIGHTBLUE_EX + 'Closing...' + Style.RESET_ALL)
        call.disconnect()
        break


Von |2016-12-05T07:49:38+01:002016-10-05|FritzboxOnAir, Python|

Geschenkpapier

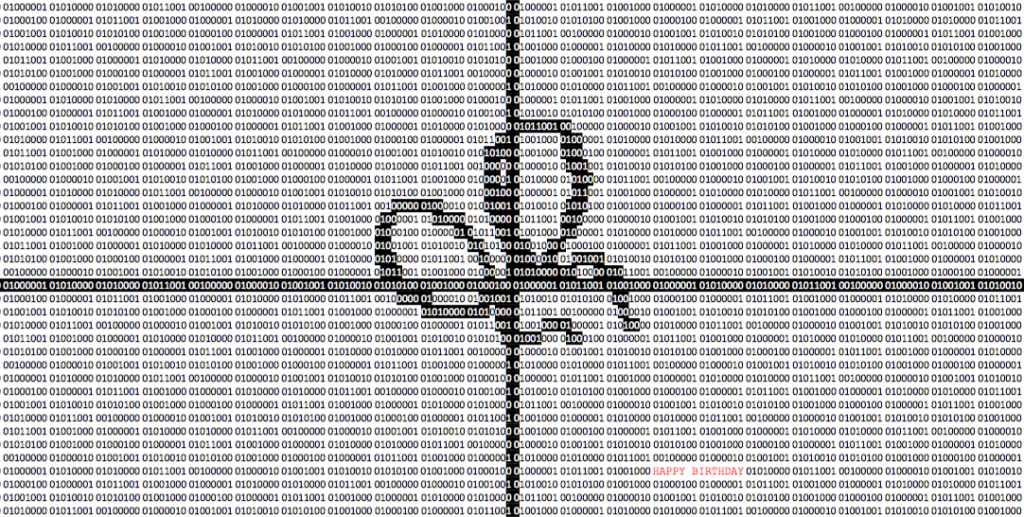
Ich hatte letzte Woche Geburtstag und habe das tollste Geschenkpapier der Welt erhalten.
Ja, Geschenkpapier, nicht Geschenk :^)

Das Geschenkpapier ist selbstgebastelt und stellt im Binärcode “HAPPY BIRTHDAY” dar.

2016-08-30_08-05-48

Die Daten sind im A2-Format…

Download: Geschenkpapier

Vielen Dank an Mane und Jassi!

Von |2016-08-30T08:10:16+02:002016-08-30|Allgemein, Coding|

Raspberry Pi Namen setzen

Ich schreib das hier auch mal auf, da ich selbst immer danach suchen muss :^)

Man muss an verschiedenen Stellen den Namen des Pis eingeben, damit dieser auch überall angezeigt wird:

sudo nano /etc/hosts
sudo nano /etc/hostname
sudo /etc/init.d/hostname.sh

Nach einem Neustart hat das Kind einen Namen.


Update

Danke an Hermann für den Hinweis… es ist (nun) möglich auch per raspi-config  den hostnamen zu setzen. Das Feature kam irgendwann hinzu… ich werde alt…

Die Lösung oben kann auch jeder Linux Distri benutzt werden :^)

Von |2016-07-14T10:14:33+02:002016-07-13|Coding, Raspberry Pi|
Nach oben